Part I : Preview picture
Hello everyone,
I had a problem with my internet connection, so this work is the one I made last sunday.
I'll begin a metamorphosis effect. I intend to integrate it in a very short video later, so this will be a preview of what I want.
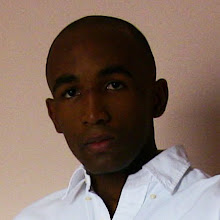
To begin, I need a reference so I know where I'm going. I'll make a picture that I'll use as a guideline. I make a photo of myself with an aggressive (roaring) facial action.

I'll use a 3D monster head I have to make a composition. I need to put a human skin looking texture to this head before. So I open 3DSMAX and load the monster head.
I apply an unWrapUVW modifier and then a cylindrical mapping. I rotate the gizmo to have a symmetrical mapping.

I switch to Photoshop were I adapt the texture I made last time for the head modeling tutorial (see here>> human head modeling).

My monster head has a "morpher" modifier. I don't think materials morph unless one apply a morpher map, but I'm not sure, so I copy and paste the UnWrapUVW to the targets. Then I make a material with my adapted bitmap on the diffuse channel. I Also map a bump map by turning the picture to gray scale mode and increasing the contrast and brightness to get a proper picture.

I use the same map for the specular level channel. I set the specular level value to 30 and the bump to 60. I put 2 spotlights in the scene. The one on the right represent the lighting from the window in the room; I set its intensity to 0,7. The second spot on the left represents the indirect lighting from the diffusion of the wall; I set the intensity of this light to 0,3.

I try to get a good scale and position for the monster head according to the head on the picture and create a camera.
It makes me realize that I need further picture, at least one: a picture of the background without the character. It's a good remark for the future video.
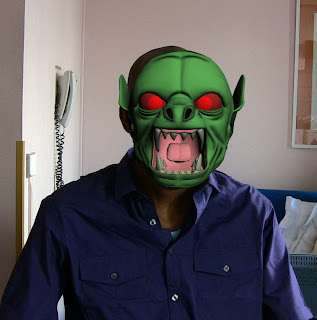
I render end go under Photoshop to fine tune the composition.

I add some noise, some blur too, because the picture is not as clean as the rendered head. Then I smooth the borders of the head and the chin. Here's what I get.

There's something wrong with the picture. First thing is the inner mouth; it looks too unrealistic I think. I must fine tune it.
As I realized earlier, I lack a background-only picture. I will remedy to this by taking another photo of the room.
I paste this new picture on a layer on the Photoshop file of my composition and try to align it with the background of the original picture. I make a basic line up and then use the perspective tool transformation to fine tune it. Now I need to replace the original background with this new picture. I'll extract the character by masking it. I use the pen tool to cut out the character (magnet lasso can do it too, but you'll probably need more tweaking).

Then I convert the path to a selection and use this selection to mask the layer of the original picture. I duplicate the path, delete the lower part of it and keep only the head. Then I close it back by cutting out the head. I convert this new path to a selection; I select the mask on the layer and fill the selection of the head with black. The head is hidden.

Now I can resize the monster head to feat my character without wondering about possible overlapping. It already gives a more realistic picture.

The values of the filters I applied to the monster are the following:
Noise: 5
Blur: 0,7
Hue/saturation: saturation=33; hue=0; lightness=0
So at this stage, what I realize is that, for the coming video, an empty background is essential.
Ok, I can go head and deal with the inner mouth. I modify the mapping of the teeth and make a bitmap for them. It' seem ok now.

The next thing I try is to compose the top of the head of the man with the mouth of the monster. Under Photoshop, I use the Lasso to select and delete the top of the head of the monster.

Then I use the transform tools to match the mouth with the head of the man (resize and distort).

After this I use the lasso again to select the border of the cut mouth where it must connect to the head.

I use the refine edge tool to apply feather to the selection; I visually set the value. I delete the selection; it makes a smooth transition with the head.

I make a "match color" operation to the mouth, to match its colors with the top of the head (I need a layer containing the head alone). Then I play with the Hue/saturation of the Master, Red and Yellow components.

I realize that I should probably have masked instead of deleting the selection, because now I can't tweak it. Finally, I have two good remarks for the video :-D . This is it; the only remaining is the video. But then, "Photoshop" will be replaced by "after effect", and I'll probably need to use vector paint (which I managed to avoid at all cost until today :-D ).Thanks for reading, Rendezvous on Sunday for the video.
Cheers!