In this post, I go throw the modelling of a human head. I intend to write it like a making of or a mini-tutorial. What will be covered is: setting the references images, modelling, mapping and texturing. Hope it'll will be useful.
Part I: guide setting (reference images)
I take several shots of "the model", from two points of view.


Then, I choose the best picture and go under photoshop. There will be a need for lens correction, so I managed to get some straight lines behind the model, so I can retrieve the lens correction settings for the camera I used. the "remove distortion" value I used was 20.
I chose two picture and lined them up:

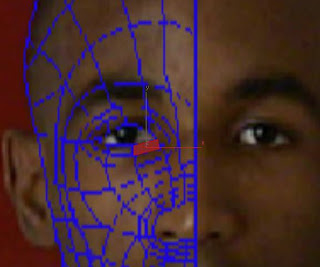
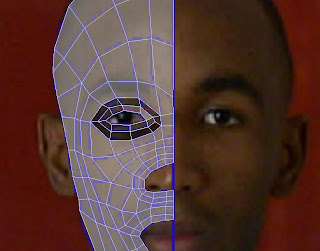
Now I go ahead and try to draw the flow of the future polygons; this can help to go faster at the modeling stage, and prevent bad topologies.
I draw my lines with the Pen tool.

There are two triangles in my topology. I stroke the paths an then, with the eraser and the pencil, I correct the topology to eliminate the triangles.

I saved three files, the side, the front with topology drawn and the simple front.
PartII: MODELING
Next I jump to 3dsmax, make a small plane in the front view and convert it to "editable poly".

Then I extrude edges to match my drawn topology in the front viewport. It results in a flat geometry, to wich I'll try to add volume in the left viewport.

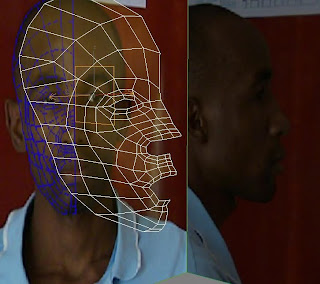
I set the viewports layout to 2 view (views menu->viewport configuration->layout) and move vertices to match the side picture. To help me in this, I go in the "object properties" (right-click on the object) and turn visibility to a low value (like 0.1).
I get something like this.

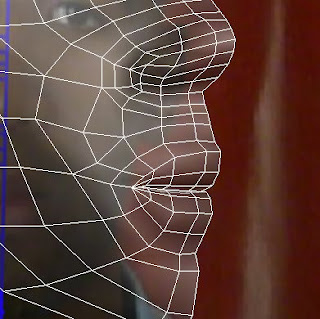
We're now going to add the nose and the mouth. This step is a bit fussy, because eyes, mouth and nose are important items of the face. Some people can be recognized just by those three shapes. So if one is messed, the whole model is messed. Ok, let's go head and begin with the nose.
I select the 3 first edges of the border of the nose, and bridge them with 5 steps.

I toggle to "border subObject" selection and cap the remaining hole. I make some little "Cut" on edges and I move vertices to shape the nose. I added a symmetry modifier above the "editable poly".

Ok, we'll do the nostrils later. We jump now to the mouth. I select the 3 first vertices and bidge them with 4 steps.

Ditto, I go into "border subObject" mode and cap the hole; I make 2 "cut". Then I move vertices to shape the lips.
I needed an extra loop of edges for the lower lip. I was hesitating to let it for later so I don't have a lot of details now in case I need a big refining. I finally go head and add the loop. I make a last cut and move the vertices.

We'll make the inside of the mouth later.
Ok, I think we can deal with the eyes now. I would usually make a sphere to shape the contour of the eye around it, but I have a finished eye, so I merged it. I move the vertices, and then extrude the edges of the eye's hole inward twice; move vertices as usual. After that, I select the bordering loop and "chamfer" them with a low value, in "local normal" mode.

I moved some vertices on the chin by the way.

Now I need to close the back of the head, add nostrils, inner mouth and ears, but I'll do this next Sunday.
Cheers!

great tutorial, thanks
ReplyDelete